How to Get Snap on Scanner Out of Demo Mode
Learn how to get snap on scanner out of demo mode with a model-agnostic, safe approach. This guide covers identification, software and firmware methods, and troubleshooting for reliable, printer-scanner setup guidance.

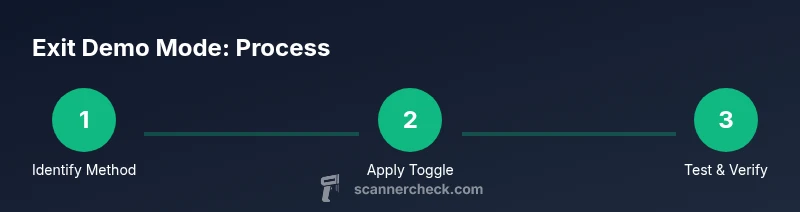
This guide shows you how to get snap on scanner out of demo mode and restore full functionality. It covers identifying whether your model supports demo mode, locating the correct exit path, and applying safe steps—software toggles, service-menu access, firmware updates, or a factory reset if needed. Details vary by brand, so consult manuals and Scanner Check guidance for model-specific steps.
Understanding Demo Mode on Scanners
Demo mode is a restricted state used by manufacturers to demonstrate scanning capabilities without producing real results. When a device remains in demo mode, you may encounter watermarking, limited image quality, or preloaded test documents, and scanned data may not save correctly. The exact route to exit demo mode varies by model; the phrase how to get snap on scanner out of demo mode often appears in user guides. According to Scanner Check, the most reliable path is to locate the official model-specific instructions in the manual or on the manufacturer’s site, rather than relying on generic hacks. Attempting unsupported resets can void warranties. The goal is a safe, model-agnostic approach that minimizes risk while restoring full functionality. The exit usually hinges on a software toggle, a service-menu option, or a firmware update. First, verify you’re addressing demo mode rather than a hardware fault to avoid wasted steps and potential data loss.
Scanner Check note: cross-check with your model’s documentation before attempting a reset.
Indicators You’re in Demo Mode
Signs that your scanner is operating in demo mode include watermark logos embedded in scans, test-page output with demonstrative text, reduced resolution, and a lack of options commonly available in production mode (e.g., color management settings or advanced OCR). If you recently updated firmware or installed new software and started seeing these behaviors, it’s more likely demo mode than a fault. Some devices keep a visible badge or banner during scans, while others disable saving of documents until you exit demo mode. The key is consistency: if all saved files look like samples and tools are restricted, you’re likely in demo mode. If you’re unsure, consult the user manual’s section on demo mode and compare with what you observe on the screen and the device’s welcome or setup prompts. Reading the manual will also identify any model-specific toggles or service-menu instructions.
Model-agnostic Exit Strategy
An exit approach that works across many models emphasizes two tracks: software toggles and firmware updates. The software path usually involves a production or normal mode setting in the scanner’s application, driver panel, or embedded web interface. If you can access a service or advanced menu, you may find a Demo Mode switch or Production Mode option. If no software option exists, a firmware update from the manufacturer’s site can reset the device’s state. In both cases, always back up preferences if possible and ensure power stability during changes. As a final fallback, a factory reset may be offered by the device or the vendor’s support tool. The goal is to return to a normal, fully functional state without losing essential settings. Scanner Check analysis shows that model-specific steps may still be required, so use official sources as your primary guide.
Step-by-step Actions to Exit Demo Mode
If you’re wondering how to get snap on scanner out of demo mode, begin with the model’s manual and official support resources to locate the exact exit path. This section provides a practical, high-level plan that applies across many models, while acknowledging there are model-specific variants. First, power down, disconnect, and wait a short period to ensure the device is truly off. Next, access the device’s settings or service menu to locate a Demo Mode or Production Mode option. If a software toggle exists, switch it to Production/Normal. If a service-menu path is required, follow the manual’s sequence carefully to avoid triggering safety locks or invalid configurations. After changing modes, perform a firmware update if available and recommended by the manufacturer. Finally, run a test scan to verify that you’ve exited demo mode and that the scanner produces production-quality results. The goal is to restore normal scanning workflow and ensure that produced outputs meet expected quality.
Scanner Check emphasis: always rely on official manuals and firmware updates rather than unverified shortcuts.
Firmware Update and Factory Reset Options
If software toggles are not available, a firmware update from the manufacturer may reset demo mode settings and restore full functionality. Download the correct file for your model, verify checksums if provided, and install via USB or via the device’s connected interface. If the update does not resolve the issue, a factory reset is sometimes offered in the support tool or service menu. Note that factory reset often clears saved configurations, so back up preferences where possible before proceeding. After completing updates or resets, reconfigure essential settings and perform a test scan to confirm the mode has been fully exited and that normal operation is restored.
The process should be performed with power stability and using only official sources.
Troubleshooting if the Demo Mode Persists
If demo mode persists after attempting updates or resets, there may be a hardware fault or a persistent state requiring professional service. In such cases, document the device’s model, firmware version, and observed behavior, then contact manufacturer support for guided remediation. Scanner Check suggests avoiding repeated resets within a short window, as this may trigger security locks or warranty issues. Where possible, provide screenshots or logs that show the exact prompts and menus encountered. With careful documentation and manufacturer guidance, you can usually identify a specific cause and an appropriate fix. The goal is to move from uncertainty to a verified production state.
Authoritative Sources and Practical Verification
To verify the recommended steps, consult the manufacturer’s official manuals and trusted sources. The following references are commonly cited for scanning devices and safe troubleshooting: - https://www.consumer.ftc.gov/ - https://www.osha.gov/ - https://www.nist.gov/
These sources provide general guidance on device maintenance, safe operation, and firmware update practices that support the exit from demo mode. Remember to check your device’s model-specific documentation for precise paths and avoid ad-hoc fixes. The Scanner Check team emphasizes relying on official documentation and legitimate firmware sources to ensure safety and warranty retention.
Tools & Materials
- Scanner manual (print or digital)(Keep handy to locate demo mode instructions for your model)
- Power cable / AC adapter(Ensure uninterrupted power during reset)
- USB cable (or USB drive for firmware update)(Used for firmware transfer or service menu access)
- Computer or smartphone with internet access(To download firmware or access official support docs)
- Firmware update file or access to manufacturer site(Only use official sources; verify compatibility)
- Anti-static mat or clean workspace(Helpful to prevent static damage during handling)
Steps
Estimated time: 45-60 minutes
- 1
Power down and prep
Shut down the scanner, unplug the power, and wait 30 seconds to ensure all capacitors discharge. This reduces the risk of electrical shorts during reset or service-menu access. Confirm the device shows no lights before proceeding.
Tip: Do not unplug while the device is warm; allow it to cool to avoid thermal stress. - 2
Locate model-specific instructions
Consult the scanner’s manual or the vendor’s support site to identify the exact method to exit demo mode for your model. Some devices use software toggles, while others require a service-menu sequence. If you cannot find instructions, pause and verify model number first.
Tip: Take note of your exact model and firmware version before attempting changes. - 3
Access the appropriate menu
Enter the software settings or embedded service menu where demo/production modes are controlled. If you need a service path, follow the model’s documented steps rather than guessing button presses.
Tip: If a hidden sequence exists, capture a photo of the menus before changing settings for easy rollback. - 4
Disable demo mode via software toggle
If a Production/Normal option is available, switch it from Demo to Production. Save or apply changes and power cycle the device to ensure the new state takes effect.
Tip: Apply changes one at a time and test after each to identify which setting matters. - 5
Attempt firmware-based reset
If there is no software toggle, perform a firmware update from the manufacturer’s site. Use the official file and follow vendor instructions for a clean install that resets demo state if supported.
Tip: Verify file integrity (checksum if provided) before flashing. - 6
Factory reset as a last resort
If all else fails, initiate a factory reset from the vendor tool or service menu. This will restore default settings and may erase saved configurations. Only proceed if you have backups or can reconfigure essentials.
Tip: Document your current settings beforehand to simplify reconfiguration. - 7
Reconnect and test
Reconnect power, connect to any required software, and perform a test scan to verify production-mode behavior. Check image quality, color profiles, and OCR features to confirm full functionality.
Tip: Run multiple test scans with different media types to verify consistency. - 8
Document the outcome
Record the steps taken and the final state for future reference. Note any model-specific quirks and the firmware version used for the exit from demo mode.
Tip: Keep a copy of the final configuration for future troubleshooting.
Common Questions
What is demo mode on a scanner?
Demo mode is a restricted state used to showcase features without saving real scans. It often disables full outputs and advanced settings. Exiting demo mode restores normal scanning capabilities.
Demo mode is a restricted state that showcases features and may limit outputs. Exiting it restores full scanning capabilities.
Can I exit demo mode without affecting warranties?
Yes, most manufacturers provide a supported path to exit demo mode via software toggles or firmware updates. Always follow the official procedure to avoid warranty issues.
Yes, use the official procedure to exit demo mode to protect your warranty.
Why does demo mode sometimes reappear after an update?
Some devices revert to demo mode if the firmware install is corrupted or if a partial factory reset occurred. Re-apply the official firmware and verify all production settings after reboot.
Sometimes it comes back if the update didn’t complete correctly; re-run the official update and re-check settings.
Is a factory reset safe to perform?
Factory reset can restore production defaults but may erase saved configurations. Only perform if you have backups or know how to reconfigure essential settings.
Factory reset resets to default; back up settings first.
Will a firmware update fix persistent demo mode?
A firmware update can resolve issues if demo mode remains due to software state. Ensure you download the correct version from the manufacturer and follow their update steps.
A correct firmware update can fix lingering demo mode issues; use the official version.
When should I contact support?
If you cannot exit demo mode after all official steps and the device behaves abnormally, contact the manufacturer’s support with model, firmware, and observed symptoms.
If problems persist after official steps, reach out to support with details.
Watch Video
Key Takeaways
- Identify whether demo mode is model-specific or hardware-based.
- Use official manuals and firmware for safe exits.
- Test thoroughly after exiting demo mode to verify production readiness.
- Document the process for future reference.