How to Scan with Notes: A Practical Guide
Learn how to scan with notes effectively. This educational HOWTO covers toolkit setup, note-taking strategies, organizational tips, and safe storage to keep your documents searchable and well-contextualized.

By following these steps, you will learn how to scan documents with attached notes so your annotations stay with the image and remain searchable. You'll assemble a reliable toolkit, choose a workflow, and attach context during scanning. The approach blends practical scanning with note-taking strategies to boost organization and future recall, as highlighted by Scanner Check.
What does it mean to scan with notes?
In professional contexts, 'scanning with notes' means more than simply capturing a digital image of a document. It involves attaching contextual information—summaries, decisions, action items, or cross-references—either at capture or in a linked notes system afterward. The aim is to preserve meaning beyond the text and make the document easier to search, understand, and reuse later. Notes can appear as on-image annotations in compatible apps, as metadata, or as linked pages in a digital notebook. When you explore how to scan with notes, you should consider both the capture method and the post-scan workflow. For instance, you might place a physical sticky note with keywords on the page and scan it alongside the document, or attach a longer contextual summary in your notes app, which links to the scanned file. This approach enhances archiving, collaboration, and compliance by ensuring contextual details survive the original page. In practice, the benefit is clear: it creates a richer digital artifact where data, context, and intent travel together.
Setting up your toolkit for notes-enabled scanning
To make note-attached scanning repeatable, start with a consistent toolkit. You don’t need the most expensive devices, but you should pick a setup that you can use reliably under typical lighting and on a variety of document types. A good toolkit includes a scanner or a smartphone with a capable scanning app, a reliable notes app, and a simple labeling system to connect notes to scans. Practically, this means choosing hardware that can produce clean images, software that supports attaching or linking notes, and a labeling habit (tags, folders, or metadata fields) that stays consistent across sessions. If you work with sensitive information, include a secure storage plan and routine backups. In this section we also discuss how to decide between manual and automatic capture modes, and how to balance speed with accuracy to fit your workflow. Scanner Check highlights that the right toolkit reduces friction and improves long-term retrieval, which is especially important when you’re managing large volumes of scanned materials.
Note-taking strategies during scanning
Notes should add value without overwhelming your primary document. Adopt a layered approach: attach a concise context in the image (e.g., a brief note in the margins or a digital annotation), then add a longer, searchable summary in your notes app. Use consistent tags and a predictable structure so you can search for related items quickly. Color coding can help distinguish document types, statuses, or departments. When you scan with notes, consider whether you want to capture handwritten annotations, typed summaries, or both, and align the method with your OCR capabilities. If your scanning app supports, enable OCR to convert images to searchable text and then attach notes that reference the detected terms. Finally, ensure you keep a small, repeatable template for notes so every scan includes the same essential fields: document title, date, source, key actions, and next steps.
Digital organization and searchability after scanning with notes
A robust digital organization system pairs file naming with metadata and a logical folder hierarchy. Use consistent naming like YYYYMMDD_documentType_source_version, and store notes in a linked, searchable app with tags that mirror your folder structure. Enable OCR where possible, so keywords inside documents become searchable, and use synonyms and related terms (LSI keywords) in your notes for broader discoverability. Link each scanned image to its associated notes through a unique ID or a shared tag, so a single search retrieves both the document and its context. Consider establishing a quarterly cleanup routine to remove duplicates, reindex files, and prune outdated notes. This section emphasizes practical steps to maintain a clean, scalable archive that remains useful as your collection grows.
Practical workflows and examples
Here are two representative workflows to illustrate how to scan with notes in real life. The first workflow suits paper-heavy environments where you need quick capture and immediate context. The second workflow works for mixed sources, including PDFs, email attachments, and photos. In Workflow A, you scan, attach a brief on-page note, then add a more detailed description in your notes app, tagging both items consistently. In Workflow B, you scan while typing notes within the scanner app, then export to your notes app where you link the items and add a richer narrative. Both approaches rely on consistent labeling, reliable backups, and periodic audits to ensure everything remains discoverable.
Troubleshooting, safety, and pitfalls
Common pitfalls include blurry scans, inconsistent naming, mismatched notes, and forgotten backups. To avoid these problems, ensure proper lighting, steady shots, and correct document orientation before scanning. Establish a universal set of tags and note fields and apply them uniformly. If you deal with confidential material, implement access controls and encryption for both the scanned images and the notes. Finally, perform regular checks to ensure OCR is functioning and that notes still align with the corresponding scans after software updates or workflow changes.
Tools & Materials
- Flatbed scanner or smartphone with scanning app(Essential for capturing documents; choose an app that supports multipage PDFs and note linkage)
- Note-taking app (e.g., Evernote, OneNote, Obsidian)(For attaching notes, creating linked references, and enabling search across scans)
- Labeling system (tags, folders, or metadata fields)(Use a consistent taxonomy that maps to both scanned files and notes)
- Extra materials (sticky notes or digital annotations)(Optional for quick on-page context; can be digital or physical)
Steps
Estimated time: Total time: 25-40 minutes
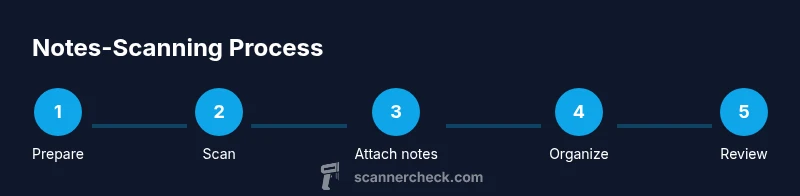
- 1
Prepare your materials
Gather the documents to scan, ensure pages are flat, and extract any preliminary notes already on paper. Decide where notes will live—on-page annotations or in a linked notes app—so you can attach context consistently from the start.
Tip: Organize documents into batches by topic or project to minimize switchovers during scanning. - 2
Choose your scanning workflow
Decide whether you will attach notes during capture (on-page or in-app) or after the scan is complete. Clarify where the final notes will reside and how you will link them back to the scanned image.
Tip: If you expect frequent updates, a linked-notes approach reduces drift between the image and context. - 3
Scan with notes attached during capture
Place notes in a way that won’t obscure critical text, scan at a high enough resolution, and capture multipage documents as a single file when possible. If your app supports detections, enable OCR to create searchable text from the scan.
Tip: Use a quick template to standardize on-page notes (title, date, source). - 4
Crop, adjust, and save
Review scans for clarity, crop margins, correct skew, and verify that notes remained legible after processing. Save in a chosen folder structure and export an accessible format (PDF or image + notes linkage).
Tip: Keep a backup copy of originals until you confirm notes linkage is intact. - 5
Tag and file notes for searchability
Apply consistent tags that reflect the document type, project, and topic. Create a mirroring set of tags in your notes app so searches return both the scan and its notes.
Tip: Consider a simple renaming convention like DOCTYPE_SOURCE_DATE to support quick filtering. - 6
Review, backup, and maintain consistency
Periodically review your notes-scans collection for accuracy, duplicates, and broken links. Back up to a secure location and document any changes to your taxonomy or workflow.
Tip: Schedule short quarterly audits to keep the system reliable.
Common Questions
What does scanning with notes involve?
Notes scanning involves attaching contextual information to scanned documents, either on the page or in a linked notes app, so the image and its context are easy to retrieve later. This improves comprehension, collaboration, and compliance by preserving meaning beyond the literal text.
Notes scanning means attaching context to your scans so the document and its notes stay connected for easy retrieval.
Which devices work best for scanning with notes?
A reliable scanner or a smartphone with a capable scanning app can work well. The key is consistency and features: OCR, easy attachment of notes, and reliable export options that keep notes linked to the scanned image.
Use either a good scanner or a smartphone app that supports note linking and OCR.
How can OCR help with notes?
OCR converts text in scanned images into searchable text. When notes are linked to the scan, OCR helps you search keywords inside both the document and the attached notes, making retrieval faster.
OCR makes scanned text searchable, aiding quick retrieval of both the document and attached notes.
How should I name files that include notes?
Adopt a simple, consistent naming scheme that includes document type, source, and date. Mirror that structure in your notes so searches return both the file and its context.
Keep a consistent naming system to link files and notes effectively.
Is it safe to store sensitive notes with scans?
Yes, but implement appropriate safeguards like access controls, encryption, and regular backups. Separate sensitive notes from public data when possible and restrict sharing.
Yes, with proper safeguards like encryption and access controls.
Watch Video
Key Takeaways
- Attach notes during scan to preserve context with the image.
- Use a consistent naming and tagging system for easy retrieval.
- Enable OCR to improve search across scans and notes.
- Back up scans and notes regularly to prevent data loss.